RANE FOUR


for VirtualDJ 8.5
Last Update : April 2023
 

SETUP


Firmware & Drivers


Firmware: Please update the firmware of the device to the latest available version at Rane DJ Downloads

Drivers: For both Windows and MacOS X computers Install the latest drivers (Control Panel) from Rane Dj Downloads

VirtualDJ Setup


Download and install VirtualDJ from our Downloads Page (in case you have not done already)

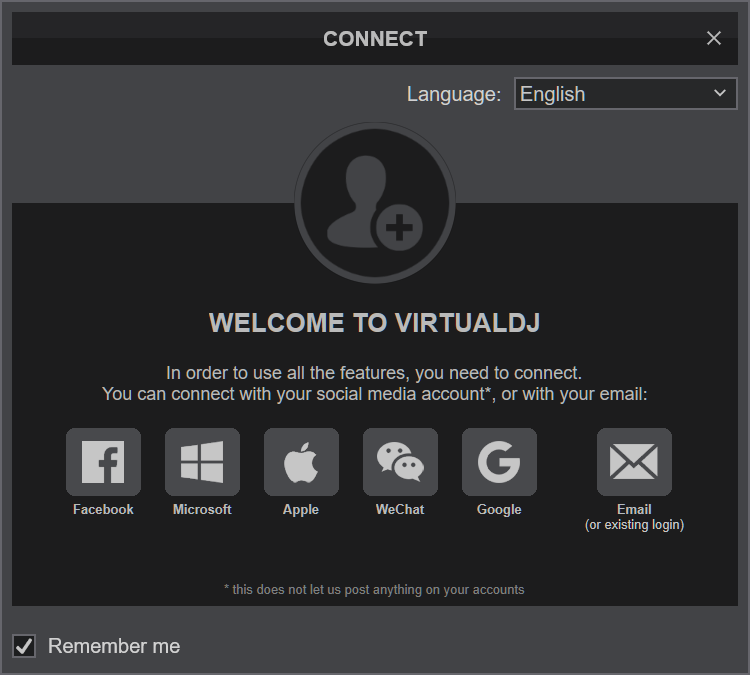
Once VirtualDJ is launched, a Connect Window will appear. Please login with your preferred method from the ones provided.

A Pro Infinity or a Pro Subscription License is required to fully use the Rane Four.
Without any of the above Licenses, the controller will operate for 10 minutes each time you restart VirtualDJ.
Buy a license


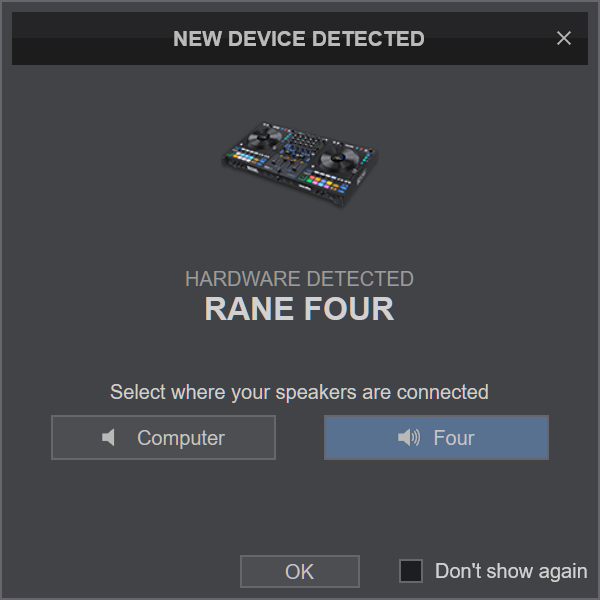
A detection window will appear next verifying proper connection with Rane Four.

Click on the "Four" button in order VirtualDJ to apply the pre-defined audio configuration for your device.

Make sure you have the top-panel Source selectors to USB-A or USB-B depending on the USB port you connected at the rear panel.

Click to OK.

The unit is now ready to operate.


MAPPING


The unit should be visible in the MAPPINGS tab of Config and the “factory default” available/selected from the Mappings drop-down list. The factory default Mapping offers the functions described in this Manual, however those can be adjusted to your needs via VDJ Script actions.
Find more details at VDJ Pedia


AUDIO Setup


The unit has a pre-defined Audio setup and a special button in the AUDIO tab of Config to provide that.
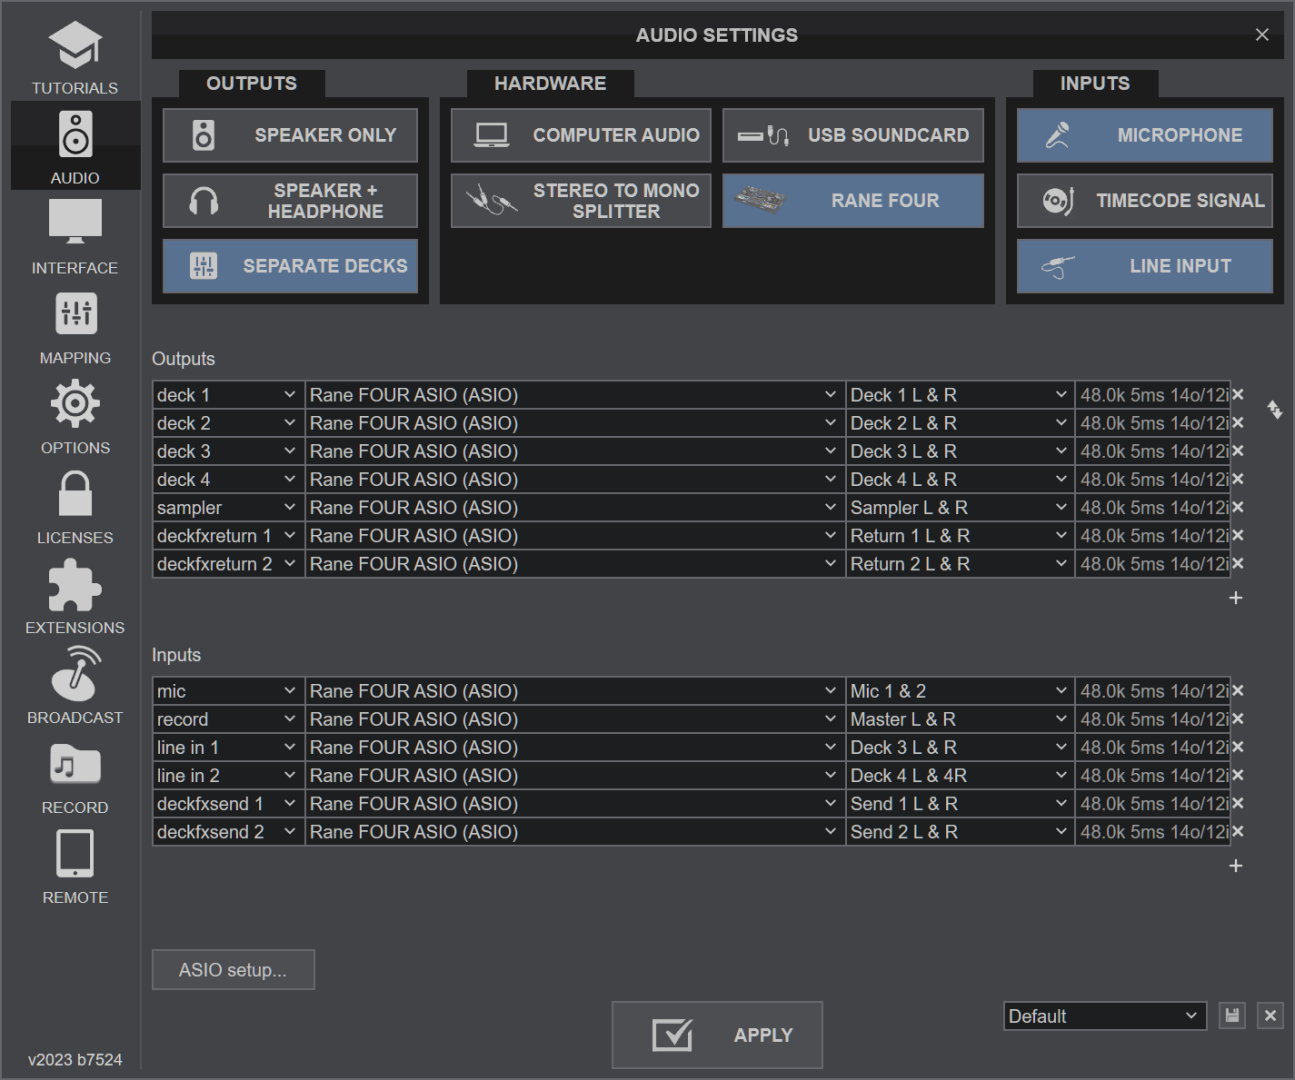


For further software settings please refer to the Manuals of VirtualDJ
 

LAYOUT


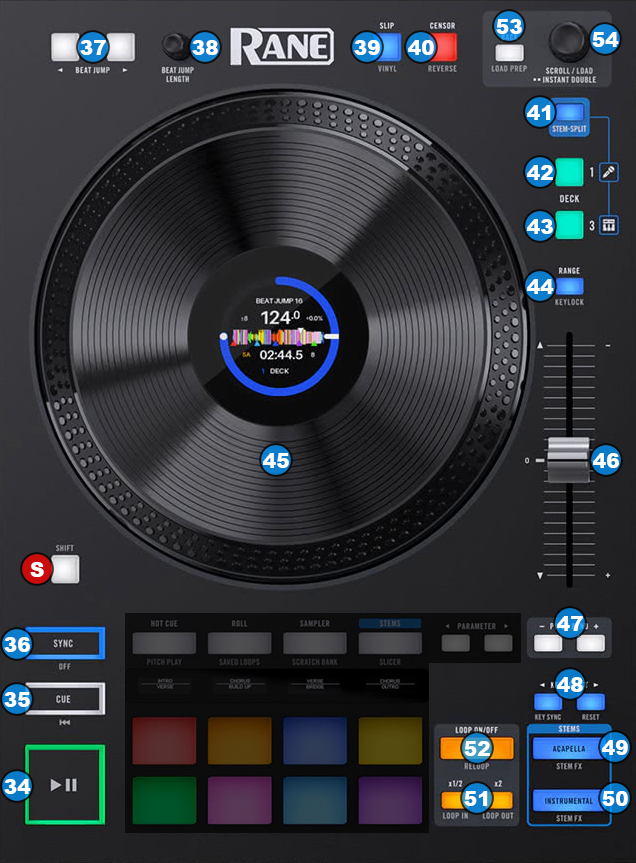
The functionality of each button, knob and slider per section (as shown in the image above) will be explained in detail in the next chapters

S SHIFT Hold this button down to access secondary functions of Rane Four as described in this manual

A MIXER & EFFECTS
B DECKS
C PADS
D FRONT & REAR
 

MIXER & EFFECTS


MIXER
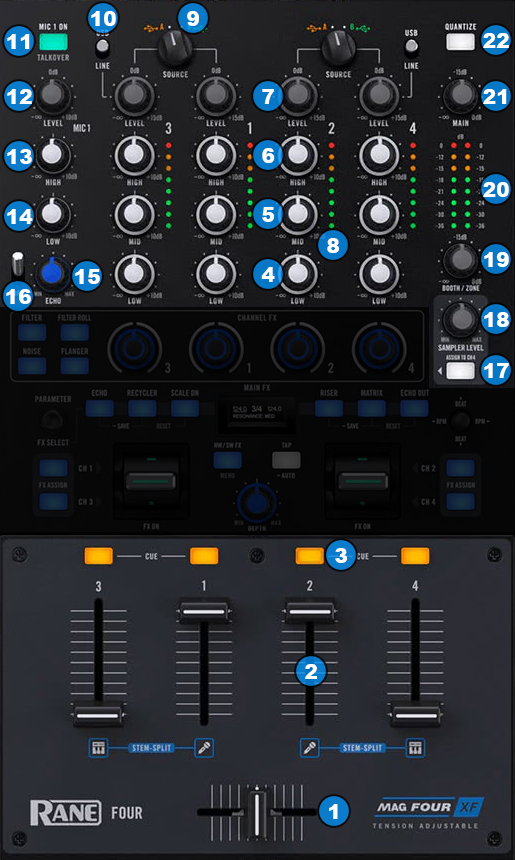


Rane Four features a fully featured hardware mixer.
All mixer operations described in this chapter are performed via the device hardware.
However, the movement of all basic mixer elements is still visible in the VirtualDJ GUI.


KEY

ACTION

1CROSSFADER
Blends audio between left and right mixer channels
2VOLUME
Adjust the Volume of each mixer channel.
3CUE
Select which Chanel/Deck will be sent to Headphones output for pre-listening.
Press multiple buttons simultaneously to send multiple Decks to Headphones at once.
4EQ LOW
Adjust the low (bass) frequencies.
5EQ MID
Adjust the middle (mid) frequencies.
6EQ HI
Adjust the high (tremble) frequencies.
7LEVEL
Adjusts the audio level (gain).
8CH VUMETER
Shows the strength of each channel’s pre fader signal.
9SOURCE
Define the digital source of each side of the controller.
Put the switchers to USB A or USB B position depending on which port you have connected your computer.
10LINE/USB
Use this switcher to toggle deck 3 and deck 4 input source between the analog inputs on the back of the device (LINE) and the digital audio bus (USB).
11MIC 1 ON
Toggles the 1st microphone input on/off.
12MIC 1 LEVEL
Adjust the volume of the 1st microphone input.
13MIC 1 HI
Adjust the high (tremble) frequencies of the 1st microphone input.
14MIC 1 LOW
Adjust the low (bass) frequencies of the 1st microphone input.
15MIC 1 ECHO
Adjust the strength of "Echo" effect for the 1st microphone input.
To adjust the parameters of the Echo effect please refer to Rane Four operation manual.
16MIC 1 ECHO SWITCH
Toggle the "Echo" effect for the 1st microphone input on/off.
17SAMPLER TO DECK 4
Press this button to route the audio of the sampler to deck 4 mixer channel.
18SAMPLER LEVEL
Adjust the Volume of the sampler.
This knob will have no effect if the "SAMPLER TO DECK 4" function is active.
19BOOTH LEVEL
Adjusts the volume of the Booth output.
20MASTER VUMETER
Shows the strength of the Master output's pre fader signal.
21MAIN LEVEL
Adjusts the volume of the Master output.
22QUANTIZE
Toggle Quantized operations for all decks on/off.
When Quantize is enabled, hotcues, loops and beatjumps will snap to the CBG of the track.


EFFECTS
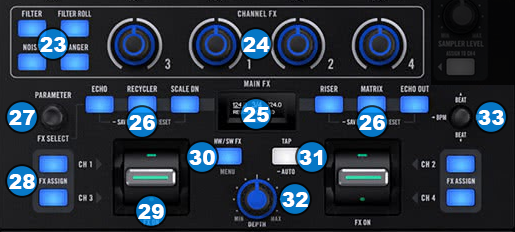


Rane Four features it's own hardware effects, but it also offers the ability to control software effects.
This chapter focuses on how to use Rane Four to control VirtualDJ effects.
It is not possible to use both hardware and software effects at the same time.


Quick EFFECTS operation guide:


KEY

ACTION

23COLOR EFFECTS SEL
Select one of the four available Color Effects to apply on the 4four audio channels.
The Color Effects of Rane Four are software effects.
24COLOR EFFECTS
Apply a Color Effect on the four audio channels.
When the knobs are placed in the middle position, no effect is applied.
25MAIN FX SCREEN
Provides various information about the selected effect(s) and it's parameters.
26MAIN FX BUTTONS
Press one of those buttons to select (arm) an effect to be executed when you operate the paddles.
When using hardware effects only one effect can be selected (armed) at each time.
When using software effects it is possible to select multiple effects at once.
Hold one of these buttons down and rotate the PARAMETER knob in order to select a new effect for the selected effect slot.
27PARAMETER
In software effects mode hold down one of the MAIN FX buttons and turn this knob to select a new effect for that slot.
In hardware effects mode use this knob to adjust various parameters of the selected effect.
28FX ASSIGN
Use these buttons to determine on which deck the selected effect(s) will apply to.
Effects can be applied only on one deck per each controller side at the same time.
29FX PADDLES
Use these paddles to activate the selected effect(s).
Move the paddles away from you to activate the selected effect(s) permanently. The paddles will latch to that position.
Pull the paddles towards you to activate the selected effect(s) momentarily.
30HW/SW FX
Press this button to toggle between using hardware and software effects.
When hardware effects are selected the button will turn blue.
When software effects are selected the button will turn amber/orange.
31TAP
Tap this button a few times to set a new BPM for the selected deck.
The selected deck is shown on MAIN FX SCREEN by underlying the BPM of the left or right side.
To switch between the left and right side use the JOYSTICK.
32DEPTH
Adjust the strength of the applied effect(s).
33JOYSTICK
Move the joystick up or down to select the beats value that's going to be used on beat-aware effects. The value is shown on MAIN FX SCREEN.
Move the joystick right or left to select which side is used for taping.


In order to adjust the parameters of the hardware effects please refer to Rane Four operation manual.
 

DECK CONTROLS


KEY

ACTION

SHIFT (SECONDARY) ACTION

34PLAY PAUSE
Press this button to start or stop the playback of the track.
Play-stutter the track.
35 CUE
Set a temporary Cue point when track is paused. Stop track at temporary position when playing and preview from Cue position while pressed
Return to the beginning of the track.
36 SYNC
Match the BPM and smoothly catch up the Phase, in order to synchronize this Deck to the opposite Deck.
Smoothly reset Track's tempo (BPM) to its original value.
SSHIFT
Hold this button down to access secondary functions of Rane Four as described in this manual.
37BEATJUMP
Press these buttons to jump back and forth within the track by a given amount of beats.
38BEATJUMP BEATS
Turn this knob to select the amount of beats that the track will jump when using the BEATJUMP buttons.
Press the knob down to select 8 beats as the beatjump length.
39SLIP
Toggle Slip mode. When enabled, operations like scratching, loop, hotcues etc will act temporarily and track will resume playback from the position it would have been if never triggered.
Toggle between the Scratch and Bend Jogwheel modes.
40CENSOR
Play track in reverse while pressed. When released, track will resume playback from the position it would have been if never triggered.
It is possible to replace the behavior of this button to "Silent Cue" mode instead, from the Rane Four setup menu.
When in "Silent Cue" mode, press this button to mute the sound of the deck. Press it once again or use any of the hotcue pads to restore the sound.
Play Track in reverse. Press again to return to normal playback.
41STEM SPLIT
Press this button to toggle stem split on/off. When enabled, deck1 will get cloned to deck 3 (and deck 2 will get cloned to deck 4) with the first deck playing the vocal parts of the track and the second playing the instrumental.
Press once to mute the sound of the deck. Press once again or use any of the hotcue pads to restore the sound ("Silent Cue").
42DECK SELECT
Press this button to select deck 1 as the left or deck 2 as the right deck. When stem split is active, press once on the active deck to unlink it from the other deck. The button's LED will start blinking. Press once again to link the two decks back. While the decks are unlinked you can manipulate each deck separately from the other.
43DECK SELECT
Press this button to select deck 3 as the left or deck 4 as the right deck. When stem split is active, press once on the active deck to unlink it from the other deck. The button's LED will start blinking. Press once again to link the two decks back. While the decks are unlinked you can manipulate each deck separately from the other.
44RANGE
Cycle through the available range % for Pitch/Tempo fader. A bigger pitch range will give you a bigger range of possible BPM matches, but the pitch slider movement will be less accurate.
Toggle Keylock on/off. When enabled, the Key of the track will retain its value when Tempo is changed.
45JOG
Touch sensitive platter for scratching (Vinyl Mode) or bending (CD Mode).
Seek through the track.
46TEMPO
Adjust the Tempo (BPM) of the Track. In middle position, the Track will have the original Tempo.
47PITCH BEND
Temporary (while pressed) slow-down/speedup the track. When released, track's tempo will resume to the value designated by the Tempo fader.
48KEY ADJUST
Press these buttons to increase/decrease the track's key by one semitone each time.
Press the KEY- button to match the key of the track with that of the other deck if the key is within one semitone range. Press the KEY+ button to reset the track's key to it's original value.
49ACAPELLA
Press this button once to isolate the vocal part of a track. Press a second time to restore the full sound.
Toggle Vocal Stems Effects on/off. When enabled, any software effects used on this deck will act against the vocal part of the track only.
50INSTRUMENTAL
Press this button once to isolate the instrumental part of a track. Press a second time to restore the full sound.
Toggle Instrumental Stems Effects on/off. When enabled, any software effects used on this deck will act against the instrumental part of the track only.
51LOOP SIZE
Halve/Double the size of the active loop (if a loop is active) or the default auto loop (when no loop is active).
Press the LOOP HALF key to set the Entry (In) point of a manual loop. Press the LOOP DOUBLE key to set the Exit (Out) point of a manual loop.
52LOOP
Enable/disable a Loop of the selected beats size.
Enables the last triggered loop (reloop).
53BACK
Sets focus to Folders list. If focus is in Folders list, open/close sub-folders.
Ads the selected Track of Browser to the Automix List.
54SCROLL/LOAD
Turn to scroll through files/folders.
Push once to load the selected track on a deck.
Doubleclick to load and clone the track from the other deck.
Turn to scroll fast through file/folders (+/-10 entries per click).


PERFORMANCE PADS


KEY

ACTION

SHIFT (SECONDARY) ACTION

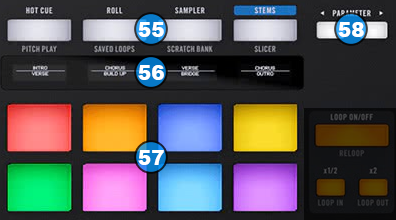
55PAD MODES
Press to select one of the 4 primary modes for Pads (led will light up bright). When a primary mode is selected, press again the same button to get one of the 4 available secondary modes (led will blink)

The pre-defined primary modes are..
Hotcues, Loop Roll, Sampler and Stems

The pre-defined secondary modes are..
Keycue, Saved Loop, ScratchBank and Slicer

The pre-defined modes/pages can be changed to your needs. Please see How to assign Pad modes
Press to select one of the 4 tertiary modes for Pads (led will blink fast).

The pre-defined tertiary modes are..
Custom, Loop, Scratch and Stems+FX
56PADS SCREEN
Display that shows the label of each pad button. When a button is active, the text is shown in negative color (black text on white background).
57PADS
Performance RGB Pads. Operation depends on the selected Pads mode (Pads page)
Operation depends on the selected Pads mode (Pads page)
58PARAMETER
Adjust the 1st Parameter of the selected Pads mode. Operation depends on the selected Pads mode (Pads page).
Adjust the 2nd Parameter (if available) of the selected Pads mode. Operation depends on the selected Pads mode (Pads page).


FRONT & REAR PANELS


CONTROL

OPERATION

59MIC 2 ON/OFF
Toggles the 2nd microphone input on/off.
604MIC 2 LEVEL
Adjust the volume of the 2nd microphone input.
61MIC 2 HI
Adjust the high (tremble) frequencies of the 2nd microphone input.
62MIC 2 LOW
Adjust the low (bass) frequencies of the 1st microphone input.
63CROSS ASSIGN
Define if a mixer channel will be output regardless of the position of the crossfader (THRU position) or Left/Right.
64CROSSFADER CONTOUR
Adjusts the contour of the crossfader.
65CUE MIX
Blends audio signal from the channels with PFL enabled and the Master Output in Headphones. When set to minimum position, only the Decks that have PFL enabled will be heard in Headphones. When set to maximum position, only the Master Output will be heard in headphones.
66CUE LEVEL
Adjust the level of the Headphones Output.
67SPLIT CUE
When enabled, the signal of the PFL-enabled Decks will be routed to one side of Headphones and the signal from Master Output will be routed to the other side of Headphones.
68HEADPHONES
Connect your headphones using 1/4" or 1/8" adaptor.
69POWER SWITCH
Turns ON/OFF the power of the device.
Please make sure that you have made all the necessary connections on the back of the unit before turning it's power ON.
70POWER CONNECTOR

Connect a standard IEC power cable.
71USB PORTS (TYPE B)
Usea standard USB cable to connect Rane Four with your computer.
You can connect up to two computers by using the two ports of the device (labeled USB A and USB B).
Make sure that you turn the SOURCE switches at the top panel to the correct USB port for software mixing.
72MAIN OUT 1
Master signal output connectors (XLR – Balanced). Use this to connect on your pro grade amplifier or self-powered speakers.
73STEREO/MONO
Toggle the master output signal between stereo and monoaural.
74MAIN OUT 2
Master signal output connectors (RCA – Unbalanced). Use this to connect with another mixer, or consumer grade amplifier.
75BOOTH/ZONE
Booth signal output (TRS – Balanced). Use this to connect your booth speakers, or an amp that needs different sound output level than master output.
76CH 3/4 INPUTS
Connect analog sources that can be used on channels 3 & 4 of Rane Four mixer. You can connect a turntable or a CD-Player,
77ANALOG INPUT TYPE
Select whether the devices connected on the analog inputs provide a line or phono level signal.
78GND SCREW
Use it to screw your GND (ground) cable from turntables that provide it, in order to eliminate ground static noise.
79MIC INPUTS
Connect your microphones. You can use both XLR or 1/4" jack connectors.